Topics:
- Introduction
- Driving style and maintenance
- Engine damage
- Engine damage due to lubrication problems
- Engine damage due to cooling problems
- Crankshaft damage
- Crankshaft and connecting rod bearings and journal damage
- Camshaft damage
- Forms of camshaft wear
- Valve damage
- Piston damage
- Bent connecting rod
- Broken wrist pin
Introduction:
Every vehicle requires maintenance. Prescribed parts are periodically replaced during a service, and the wear condition of other parts is checked at every inspection. If there is a suspicion that the part will not last until the next service, replacement is advised. In addition to regular maintenance with an inspection, it may occur that a part fails. The quality of the material has a major influence on this, as does the degree to which timely maintenance has been carried out. With a vehicle where service intervals are exceeded, repairs are postponed, or a non‑expert overlooks wear parts, the chance of failures is greatest. It becomes especially annoying when the vehicle is on the road and you end up stranded at the roadside with a defect that could have been prevented.
This page about engine damage originates from the chapter “Diagnosetechniek, mechanisch meten” (diagnostic techniques, mechanical measuring) in which measurements on engine components are described. Such measurements are carried out on dismantled engine parts (e.g. comparing piston and cylinder diameter, determining cam height, checking clearances) and stem from a diagnosis in which the cause of a malfunction was being investigated. In the workshop, a car may be brought in where the customer reports the following complaint:
“The engine warning light is on and the engine has noticeably less power than before.”

- The mechanic or diagnostic technician connects the EOBD tester to the vehicle and reads out the fault codes:
- Fault code P0172 – fuel mixture control bank 1: system too rich
- The fuel trims are read via the live data. This shows the value: -15.
From the fault code and the long term fuel trim it can be concluded that the lambda sensor in the exhaust gases is measuring a mixture that is too rich. The mechanic or diagnostic technician performs several tests in the electronic domain and looks for mechanical causes. During the diagnosis, he or she removes the valve cover and discovers that the cams on the camshaft above cylinder 4 show wear marks. This raises the questions:
- Is the camshaft wear the cause of the fault? Worn cams can result in less air being able to flow into the cylinder, causing a rich mixture (excess fuel as a consequence);
- In the case of wear: what was the cause? How can we prevent the problem from occurring again in the future?
On the pages “Mechanical diagnosis” and “Measuring engine components” we cover various components and the measuring techniques, such as measuring the camshaft. On this page we focus on the actual damage and its cause. If we can determine the cause, we can also prevent the customer from returning in the foreseeable future with the same problem.
Driving style and maintenance:
Sooner or later every internal combustion engine can suffer damage. Some engines are known for their sensitive and weak points; in other cases the vehicle owner has been negligent in maintenance, or the driving style has played a role in a wear process. Age can also throw a spanner in the works: no engine lasts forever.
A good driving style benefits every engine:
- Do not let a cold engine idle for too long: the engine stays cold for too long;
- Drive gently with a cold engine and give the oil time to warm up properly;
- Do not drive too many short trips. An occasional long drive is also good for an engine;
- Always driving gently at low revs, especially with modern engines, increases the risk of internal contamination. Think of: a clogged intake port (intake manifold), extremely contaminated intake valves, a carboned‑up EGR, carbon deposits between the piston rings resulting in oil consumption. In extreme situations, sticking piston rings cause scoring in the cylinder wall.
- Do not put too much load on the engine at low revs: driving at fifty in fifth gear means the engine is at low rpm. Bearings are heavily loaded. When accelerating under these conditions, enormous forces act on the crank / connecting‑rod mechanism;
- Do not visit the high‑rpm range too often. It does no harm to accelerate briskly from time to time, but do not overdo it.
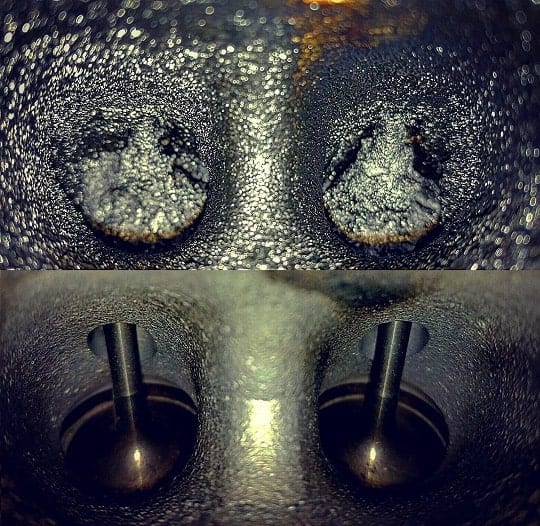
The following image shows a contaminated intake tract. The intake air can pass the valve less easily, so during the intake stroke less oxygen is available for combustion. This can be observed, among other things, when looking with an endoscope.
In addition to a good driving style, every engine must be maintained preventively:
- Aged engine oil increasingly loses its dirt‑absorbing and lubricating properties. Parts that slide along each other are provided with a contaminated oil film that lubricates less well. As a result, the oil turns into a solid substance (black sludge) and adheres to all (especially cold) engine components. Oil passages become clogged, with all the consequences that entails;
- Oil of poor quality: topping up oil with incorrect specifications or viscosity can in the short term have an adverse effect on contamination, oil consumption and engine damage;
- Mechanical work such as checking valve clearance (if applicable), replacing spark plugs, the air filter, the timing belt, etc. must be checked periodically. A car that mainly covers motorway kilometres can often drive more kilometres with the same spark plugs than a car that does a lot of city traffic. That is why in most cases, in addition to a distance‑dependent interval, there is also a time‑dependent interval;
- Defects in components can often be detected at an early stage. Do not keep driving too long with warning lights or unusual noises. Have the car periodically inspected by an experienced car mechanic.
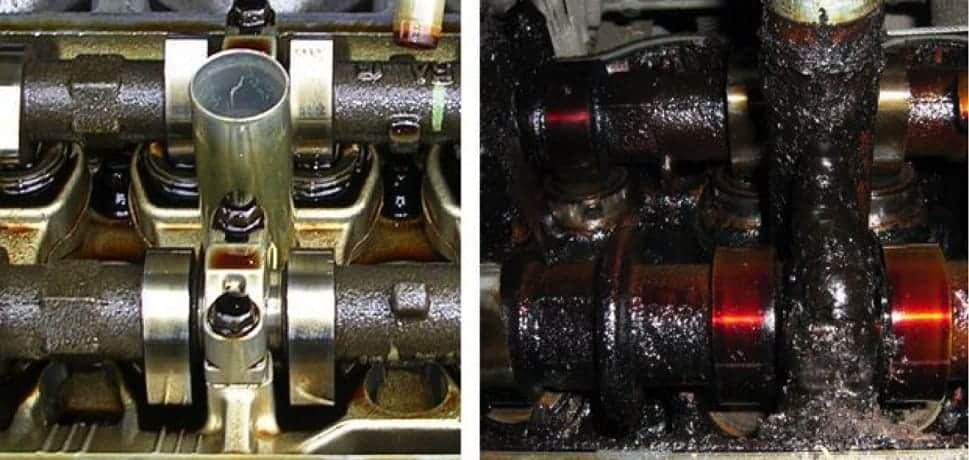
The picture below shows two situations: the same type of engine with good, preventive maintenance (left) and an extremely contaminated engine that has driven 100,000 km on the same oil (right). In addition to the black deposits on the camshaft (black sludge), the engine components are also discoloured reddish‑brown. This is largely a consequence of old engine oil and an excessively high temperature due to a low oil level.
Engine damage:
Engine damage is not always a direct consequence of contamination. When we discover extreme contamination of the intake valves, this has led to complaints such as: reduced power, an illuminated engine management light which, when reading out, shows a negative fuel trim, but it has not yet caused permanent damage. Professional cleaning (carbon / walnut blasting) can eliminate the complaints. However, if one continues driving with the extremely contaminated valves, damage can eventually occur because the valves can no longer seal properly on the valve seats in the cylinder head.
Internal contamination due to aged engine oil, poor driving style or another cause of accelerated wear can cause components to fail prematurely. If the resulting complaints are investigated and correctly traced, this wear process can be stopped. If the indications that something is wrong are ignored, the car may break down on the road, or the consequential damage may be greater than if the problem had been tackled immediately.
Engine damage due to lubrication problems:
In recent years, maintenance intervals have been extended more and more. In the 1970s it was not unusual to change the oil after 7,500 km. Nowadays we see specifications where the oil only needs to be changed at 30,000 or even approaching 40,000 km. With the extended maintenance intervals, there is a risk that, if the oil level is checked too infrequently, the engine will run with too little oil. The (too small) amount of oil therefore becomes much hotter, evaporates faster, causes more contamination and offers increasingly poorer lubrication. For that reason, vehicles equipped with extended maintenance intervals are fitted with an oil level and quality sensor. With many short trips, the oil is subjected to up to three times the load compared to driving the same distance on the motorway. The level sensor of course monitors the level and triggers a warning to the driver when the level is too low. The quality sensor (usually in the same housing) monitors the quality. With thickened, aged oil, the oil change interval becomes considerably shorter. We speak of “variable maintenance intervals” when a standard interval of 30,000 km and 2 years is specified, but a maintenance warning already appears after 20,000 km and one year: due to the driving conditions, the quality of the oil has become so poor that it must be changed earlier.
If the oil is not changed in time, it will, as already described, evaporate and thicken more quickly. The sludge that remains ends up throughout the engine. The first place where this substance accumulates is in the pickup strainer in the oil sump. The oil pump draws oil from the sump through this oil strainer. The oil pump then forces the oil through the filter. The coarse particles are retained by the strainer.
Another cause of a contaminated oil strainer is an accumulation of fibres originating from a wet timing belt, as is currently used on PSA and Ford engines. When engine oil with incorrect specifications is topped up, the wet timing belt becomes damaged and the loose fibres mix with the engine oil.
The following image shows an example of an oil strainer in good and in contaminated condition. It is obvious that far less oil can pass through the heavily contaminated strainer: due to this blockage, the oil pump can no longer circulate the oil through the engine properly.
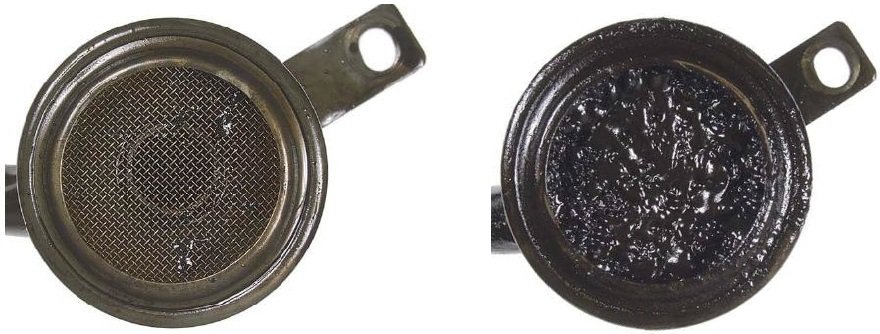
The problems start with the clogged strainer: at low engine speeds the oil pump rotates too slowly to achieve sufficient oil pressure. For that reason, a lack of oil pressure can occur at idle speed. Components such as the crankshaft and connecting‑rod bearings, the camshafts in the cylinder head, the pistons in the cylinders and the turbo shaft risk having to move with too small a lubricating oil film, resulting in more heat development and a likelihood of metal‑to‑metal contact.
In addition to thickened oil and black sludge, other materials and constituents can also cause the oil strainer to become clogged. Think of: plastic parts from a broken timing chain guide, residues of (excessively applied) liquid gasket from the valve cover or oil pan, dirt that has entered the oil when unscrewing the oil filler cap and removing the dipstick, etc.
If there is a suspicion that the engine is heavily contaminated internally, the engine can be “flushed” by mixing an additive with the old oil. This flushing agent acts as a cleaning fluid and causes dirt particles to loosen from the engine components. In extreme situations the dirt particles accumulate in the oil strainer and remain in it, even after the oil has been drained. That is why, in the case of such contamination, it is wise after flushing to remove the oil pan and the strainer and thoroughly clean both before filling the engine with fresh engine oil.
Engine damage due to cooling problems:
Cooling problems can be a direct consequence of lubrication problems. In the previous paragraph, examples were given of causes that can lead to a lack of lubricating oil. With an insufficient lubricating oil film between moving parts, a lot of heat is generated, with a high risk of immediate engine damage.
A lack of engine cooling can also arise due to a defect in the cooling system:
- Insufficient flow through the radiator as a result of a blockage;
- A malfunctioning cooling fan due to a fault in the control circuit;
- Restriction in a coolant hose or passage, for example due to a kink or a hose that has gone soft, or a clogged radiator;
- Air in the cooling system because, after a repair and refilling, the system has not been bled properly;
- Insufficient circulation of the coolant due to a defective water pump (broken impeller blades) or slip between the pulley and the serpentine belt (if not driven by the timing belt);
- A defective thermostat;
- A defective head gasket: combustion gases enter the cooling system, and vice versa.
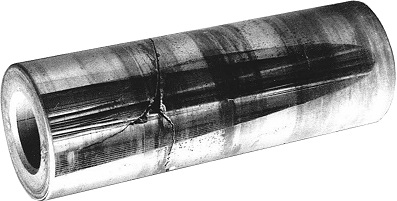
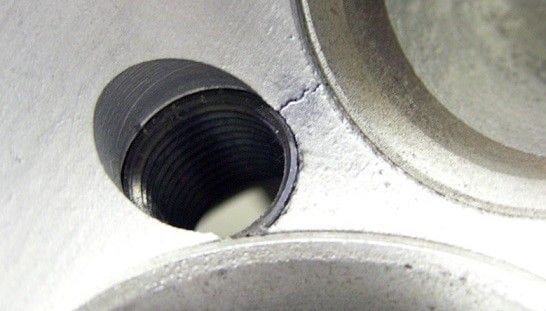
Overheating of the engine can cause the cylinder head to warp and crack. Therefore, after removing the cylinder head, its flatness and the head itself must be checked for cracks. Cracks will usually occur in the areas with the least material: here the heat dissipation is the poorest.
Examples include: cracks between the valve seats, or between the valve seat and the spark‑plug hole (petrol engine) or the prechamber (older diesel engine). Specialized overhaul companies have the knowledge and tools to weld a cracked cast‑iron cylinder head in most cases.
The following image shows a crack between the valve seat and the spark‑plug hole.
As a result of overheating, wear can occur on pistons and cylinders. In that case, the temperature has caused excessive expansion of the parts, which can cause the piston to seize in the cylinder.
Crankshaft damage:
An earlier paragraph covered damage to the crankshaft and connecting rod bearing journals. Such damage is the result of a lack of lubricating oil.
A crankshaft is subjected to a lot of forces and vibrations. In extreme cases, the crankshaft can break. In almost none of these cases is it a material problem, but rather the result of a defect in another part of the engine or an event while driving:
- Mechanical overloading due to abnormal combustion or hydraulic lock;
- Sudden seizure due to a defect in the final drive (gearbox or differential);
- Excessive vibrations due to a defective dual-mass flywheel, play in the vibration damper or attached equipment such as a PTO on commercial vehicles, where a vibration with too high a frequency occurs within a certain rpm range;
- Material weakening due to previous bearing damage;
- Unprofessional installation of connecting rod and main bearings;
- Mechanical damage to the crankshaft prior to assembly.
Crankshaft and connecting rod bearings and bearing journal damage:
The crankshaft and connecting rod bearings are located at the bottom of the engine block. Lubrication is provided by the oil that passes through the oil channels in the crankshaft, via the holes in the crankshaft journals, into the space between the journal and the plain bearing. The plain bearings are subjected to very high forces, so an oil film between the moving parts is essential.
One of the biggest causes of connecting rod bearing damage is a lack of oil. This can occur in, among others, the following situations:
- The engine loses its oil due to a leak. This can be caused by: a defective turbo, an incorrect seal between two components due to a torn gasket;
- The driver does not check the oil level often enough, despite the engine consuming a lot of oil;
- The oil pump has too low an output due to a defect in the pump or a restriction in the suction part;
- The engine block is tilted too far:
– in a car this can, especially in combination with a low oil level, lead to lubrication problems.
– On motorcycles, bearing damage occurs after the motorcycle tips over and the engine is not switched off in time. Switch off the engine as quickly as possible using the ignition switch or the kill switch.
When there is an oil shortage, the oil pressure warning light comes on. The pressure has then dropped to 1 bar. This warning light alerts the driver that the engine must be switched off to prevent consequential damage. In many cases it is already too late: when the oil pressure warning light comes on due to a low oil level, the temperature has already risen significantly and the pressure has been too low for some time. The oil temperature between the crank pin and the plain bearing has also increased. The back pressure in the oil channels will also have dropped, causing more clearance. The oil film normally compensates for this clearance. Without an oil film, the parts make mutual contact and mechanical friction occurs.
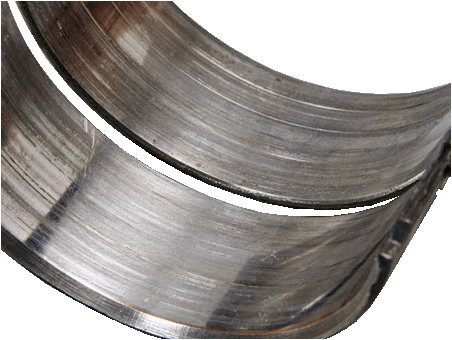
Modern cars are often equipped with an oil level and temperature gauge. Both will give a warning beforehand, before the oil pressure warning light is activated by low oil pressure. When the oil pressure warning light has been on, it is in all cases advisable to check the connecting rod bearings for damage. The two images below show the damage caused by lack of oil.

Damage to crankshaft and connecting rod bearings and journals does not only occur in case of lack of lubricating oil. Other factors also contribute to possible damage:
- Low Speed Pre-Iginition: in uncontrolled combustion that occurs while the piston is moving from BDC to TDC. This occurs mainly in downsized engines with direct injection that are often equipped with a turbo. Combustion takes place at the wrong moment, causing enormous forces on the piston. The piston, timing drive and bearings can therefore be damaged.
- Driving style: when the engine is cold, the oil is still thick and lubrication between the bearings and journals is not yet optimal. Under heavy engine load with a cold engine, the risk of bearing damage is high.
– high load at low engine speed: the upper connecting rod bearings are subjected to extremely high forces at the point where the connecting rod is positioned (almost) vertically above the crankshaft;
– low load at high engine speed: when the piston moves upwards, enormous forces are released which are absorbed by the lower connecting rod bearings.
In addition to bearing and journal damage, other engine components such as the pistons also wear faster with this driving style. Naturally, the above can be prevented by accelerating gently with a cold engine, i.e. with little load and not above 3000 rpm.
The image below shows the forces in the engine while running in five different positions. The decomposition of the piston forces is explained further on the page: decomposition of piston force. In these illustrations we see the force Fh appear several times. Fh indicates the force on the main bearing. This force is different in every engine position. Also, when the piston moves from TDC to BDC, the upper main bearing is loaded, and from BDC to TDC the lower main bearing is loaded. The explanation under the image describes the force on the main bearing in the following five images.

- The connecting rod is positioned vertically above the crank pin. The force on the upper main bearing (Fh) is equal to the force on the piston (Fz) as a result of the combustion pressure (p). The upper connecting rod bearing is also loaded with an equally large force.
- The crankshaft rotates and the force Fh has decreased;
- The force on the main bearing is 0 because a 90-degree angle has formed between the crank pin and the connecting rod;
- The lower main bearing and the upper connecting rod bearing are loaded;
- The force on the lower main bearing and the above-mentioned connecting rod bearing is higher again here.
By visually inspecting the bearing shells and bearing journals and by measuring the ovality and taper of the main bearing journals and the connecting rod bearing journals with a micrometer, the wear can be determined.
When installing connecting rod bearings, great care must be taken to ensure that bearings must absolutely not be interchanged. The bearings have worn in to the bearing journals. Swapping them will in all cases cause increased wear on the bearing and possibly also on the bearing journal. When installing new bearings, you must use plastigage to check the clearance between the bearing and the journal. Bearings that are too thick make it harder to form an oil film between them, causing friction.
Camshaft damage:
The camshafts are located at the top of the engine. In an engine that has just been started, the lubricating oil will reach the camshafts last. Camshaft damage can occur as follows:
- Due to low oil pressure the cylinder head, in addition to the turbo and connecting rod bearings, will suffer the most damage;
- When the engine runs at high revs immediately after starting, the oil has not yet (sufficiently) reached the cylinder head;
- Moisture in the oil or cylinder head can have a devastating effect on the camshaft. The following example elaborates on this.
Frequent short trips can lead to sludge formation. In winter the sludge (consisting of water vapour and oil residues) can freeze, forming a blockage in oil supply and return.
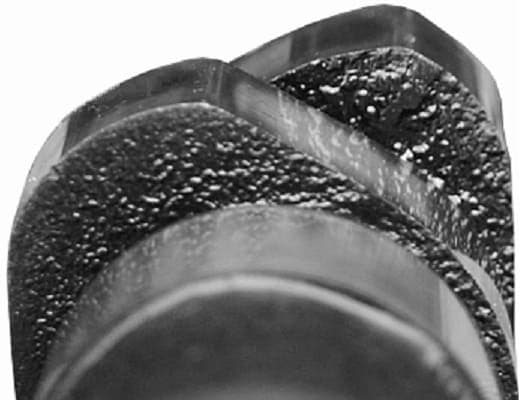
Moisture can also have a devastating effect, as can be seen in the following image. The lobes are affected and contain pitting corrosion. It is striking that the upper camshaft is more severely affected than the lower one. This is probably related to temperature: the intake camshaft warms up less quickly than the exhaust camshaft, so moisture causes more damage.

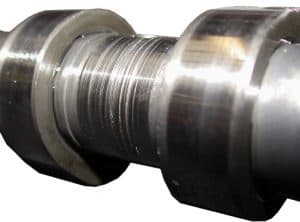
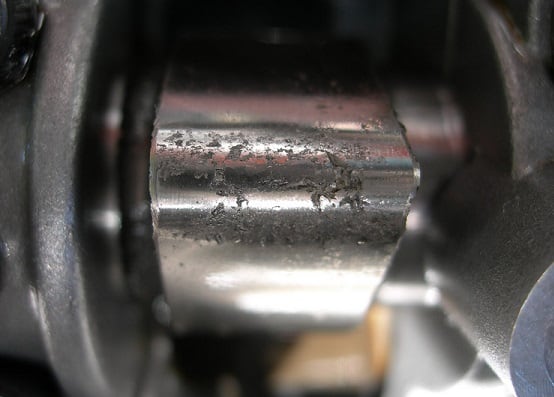
In case of a lack of oil, or when the bearing caps are swapped, damage to the camshaft can occur as shown in the following image. Deep scratches have formed because material has been removed.
Such damage can lead to oil pressure loss: because considerably more space has arisen between the bearing cap and the camshaft due to the reduced diameter of the camshaft, the oil can flow out more easily.
The damage affects the camshaft bearings after this bearing. Example: the oil channel runs from cylinder 1 to cylinder 4. The camshaft damage is at cylinder 3. Because too much oil “leaks away” along the bearing at cylinder 3, the bearing at cylinder 4 receives too little oil.
Due to a lack of lubrication, the camshaft will not only wear at the bearing caps, but wear can also occur on the lobes. The cam height may decrease due to material wear. The two images below show an extremely worn lobe (left) and blunt lobes (right).
A blunt, i.e. less pointed (high) lobe has a negative effect on valve timing. Not only will the valve open later and close earlier, it will also open less far. The volumetric efficiency decreases. This can be noticed as lower torque and less power at (mainly) higher rpm.

It sometimes happens that a camshaft breaks. The reason is not always traceable. In certain cars, including Opels (with engine codes Z12XEP and Z14XEP), this is a common problem for which a recall has been issued.
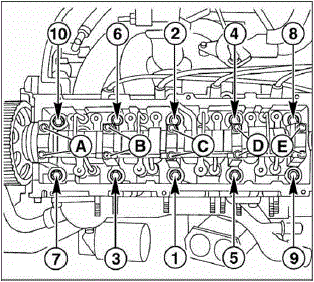
With incorrect disassembly and assembly procedures there is also a risk of breaking the camshaft. During workshop operations, the correct sequence must be followed:
- Assembly: start at the inner camshaft bearing and work in a criss-cross pattern towards the outer sides (see the image from 1 to 10);
- Disassembly: when disassembling, always start with the outer camshaft bearings. First remove the two bolts of camshaft bearing cap A or E, remove the bearing cap before disassembling camshaft bearing E. Remove bearing cap C last.
If an incorrect disassembly and assembly sequence is followed, the forces released by the valve springs pressing against the camshaft and by “trapping” the camshaft, causing it to bow, can cause the camshaft to break.
Forms of camshaft wear:
The wear that occurs on camshafts can be divided into three groups:
- pitting;
- adhesive wear;
- abrasive wear.
Pitting:
When we find small pits and cracks in the material of the lobes, we are dealing with so-called “pitting”.
With pitting, small cracks form under the hardened surface of the material as a result of fatigue. This phenomenon occurs mainly in sliding contact, as in this case, where the camshaft slides over the rocker arm or hydraulic tappet.
With pitting, material is lost, so the only remedy is to replace the respective camshaft.
Adhesive wear:
This occurs when the surfaces come into contact with each other, for example due to an oil film that is too thin. Because of this contact, pieces of metal can break off the camshaft. If the pieces are small enough, engine damage does not have to occur immediately: the particles are carried away to the oil filter. When surfaces slide against each other with great force, there is a risk that the metal parts will weld together (micro-welding). Over time the material next to these tiny welds breaks off, and grooves form in the parts that fit exactly into each other. This is the so-called “scuffing” of the camshaft.
Abrasive wear:
This type of wear occurs when particles of another material unintentionally end up between the moving parts. This can be the case with adhesive wear, where detached metal particles end up somewhere in between, or dirt particles that have entered, for example, via the oil filler cap. The dirt particles scrape material from the surfaces of the components.
Valve damage:
A petrol or diesel engine can suffer valve damage. In practice, we encounter the following types of damage:
- burnt valves and valve seats;
- corrosion, erosion and deposits on valves and valve seats;
- deformation as a result of a timing drive fault;
- breakage;
- valve stem damage.
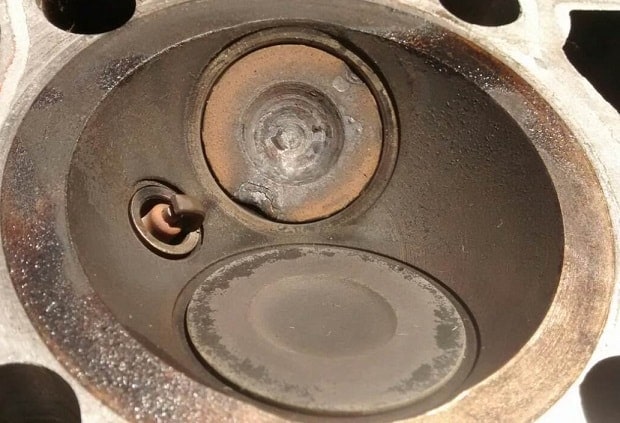
The following image shows a burnt exhaust valve. The valve head shows deformations with discolouration. A burnt valve causes loss of compression: in the closed position, the valve must retain the air during the compression stroke, but in this case it will not seal properly. During the compression stroke, part of the air escapes past the valve into the exhaust. Although an exhaust valve becomes much hotter than an intake valve, an intake valve can also burn.
A valve can burn if it overheats. The valve will deform, which can lead to material fracture. Causes of overheating can be:
- insufficient ability to dissipate heat via the valve head to the valve seat, e.g. due to deposits between the sealing surfaces and excessive valve guide clearance;
- exhaust gas temperature that is too high;
- too little valve clearance, which may cause the valve to remain open.
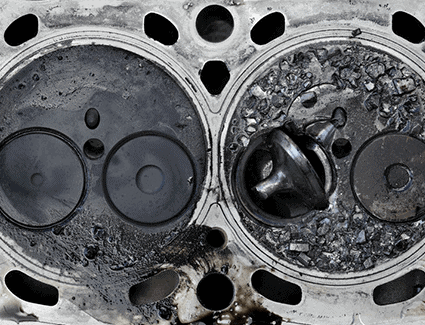
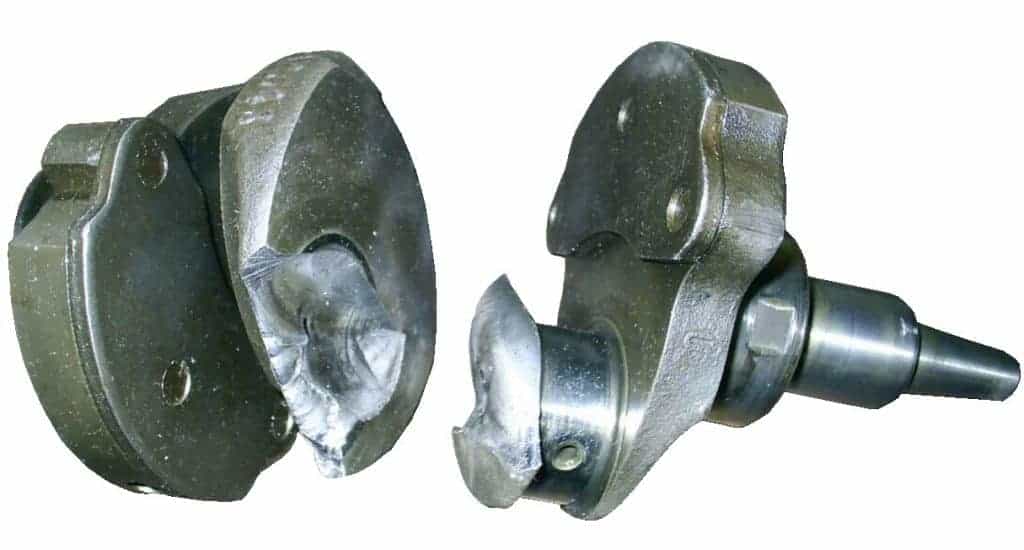
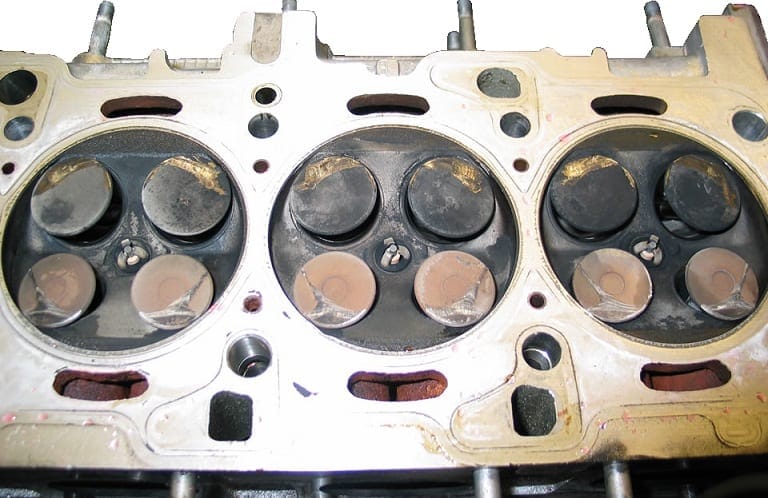
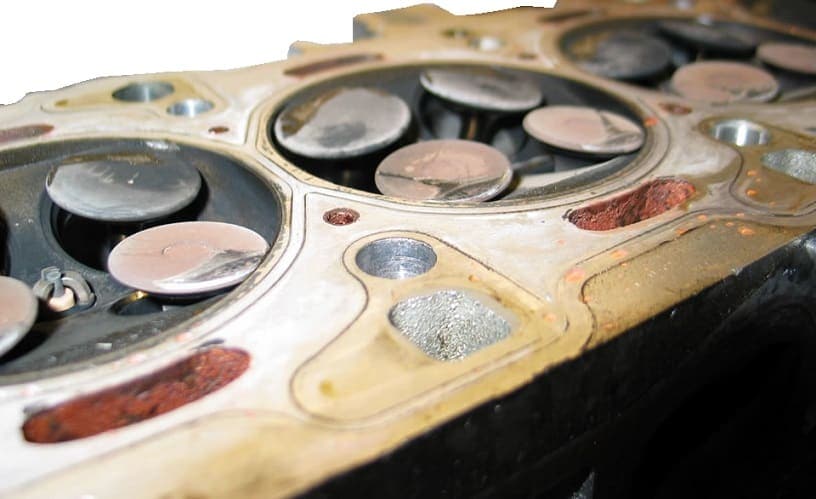
The two images below show the result of a broken timing belt. All twelve valves are bent and you can clearly see the imprint of the piston on the valves. In addition to a broken timing belt, this damage can also occur with a broken or stretched timing chain.
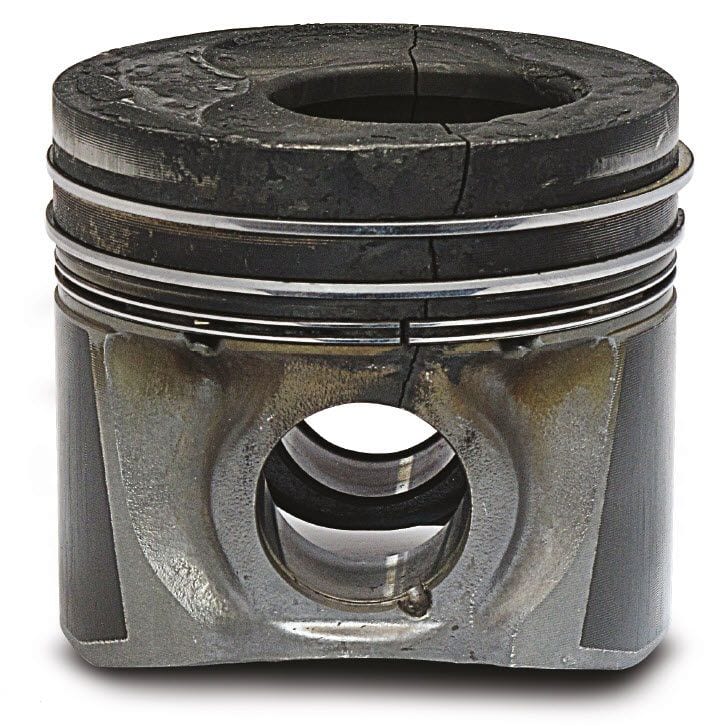
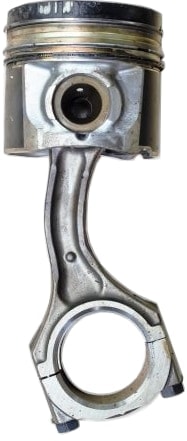
Piston damage:
There are various forms of piston damage, e.g.: distortion, scuff marks, signs of melting, breakage or detached metal particles. Possible causes of piston damage can be:
Scuff marks on the piston skirt:
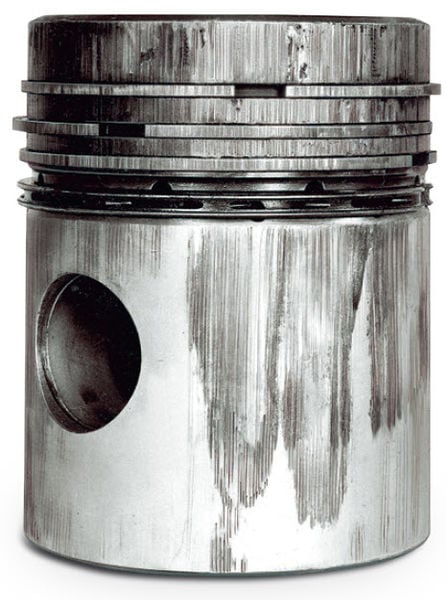
Heavily aged and contaminated oil, oil with an incorrect viscosity index, or lack of oil cause lubrication problems. This can be a cause of scuff marks on the piston skirt. When the oil film breaks down, dark-coloured scuff marks appear. This surface is usually not shiny and the piston damage mainly occurs on one side (thrust side).
When, as a result of an excessively rich mixture or a failing ignition system, there is prolonged incomplete combustion in which the injected fuel does not ignite, the fuel condenses on the cylinder wall and weakens the oil film.

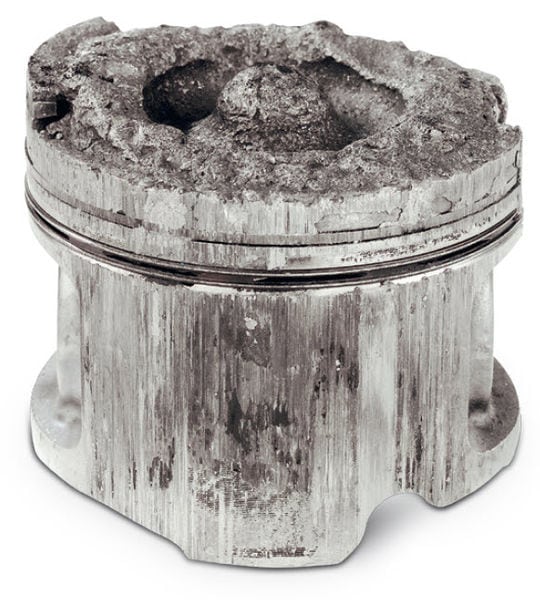
Scuff marks on piston crown and piston skirt:
Due to overheating, the clearance between the piston and cylinder may have become smaller and the oil film may have been squeezed out. Boundary lubrication occurs because the oil film is broken by the high temperature. Dry friction arises. The skirt of the piston (the side) is damaged (scuff marks) and parts of the piston at the height of the piston rings may break off or the piston material may melt. Possible causes are:
- Pre-ignition, detonation or a dribbling injector;
- Prolonged high load during the engine run-in phase;
- Faults in the engine cooling system, such as lack of coolant, defective water pump, insufficient cooling of the coolant, etc.
- Faults in the oil supply (oil jets under the piston).
Piston fracture
When driving for a long time at (too) high engine speed or under too heavy a load, such as after software tuning without mechanical modifications, especially when the engine has not yet reached operating temperature, there is mechanical overloading. This can be caused by:
- Detonation: petrol engines can start to detonate with an incorrect octane rating, an excessively high compression ratio, a mixture that is too lean, an incorrect ignition timing or excessively high intake temperatures. Detonation creates very high pressures that squeeze out the lubricating oil film and cause temperatures to rise significantly. The result is that piston material between the piston rings breaks off, or that a hole forms in the piston;
- After chiptuning: in a software-modified engine, the pressure can become too high for the non-modified engine components. As a result of the combustion pressure, the piston can break;
- Dribbling injector of a diesel engine: this causes too much fuel to enter the combustion chamber and part of the fuel ignites on / in the piston crown. Metal particles in the piston crown may become loose due to the occurring inertial forces and the erosion caused by the combustion gases.

Wear of the piston coating and cylinder liner
In engines with high oil consumption or tilting pistons, we often see wear of the piston coating and bright spots in the cylinder liner. In these areas the honing grooves are worn and have become smooth. Possible causes are:
- high mileage;
- frequent idling and driving short distances;
- insufficient maintenance, resulting in increased wear due to aged oil.
This wear can be recognized by one or more of the following effects:
- increased oil consumption because oil can easily pass the piston rings into the combustion chamber;
- blue smoke or black soot particles in the exhaust gases;
- rattling noises at idle and higher engine speeds because the clearance between piston and cylinder has increased. We also call this a “tilting” piston.

Not only due to the aforementioned conditions and consequential damage, but also after a repair or overhaul, new piston damage can occur:
- Cylinder wall contains irregularities: an old wear process or defect may not have been properly detected and the piston has been installed in a damaged cylinder;
- Unskilled assembly: careless installation of the piston rings and pistons can cause (slight) damage that will lead to consequential damage in the longer term. Too little clearance between piston and cylinder also entails a high risk of consequential damage: as the piston expands, scuffing can occur. Scuffing due to small clearance is usually recognizable by shiny spots with a dark-colored edge.
Overtightening or uneven tightening of the cylinder head bolts can also lead to piston damage because it can cause deformation of the cylinder liner; - Installation of incorrect piston rings: if the ring end gap is too small, the piston ring can jam as it expands during warm-up and start scraping in the cylinder;
- Pistons hitting the valves: after installing an incorrect piston type with incorrect valve cutouts, a head gasket that is too thin, insufficient valve clearance, or an incorrectly installed timing belt or chain, the piston may contact the valves.
Bent connecting rod:
One or more bent connecting rods can be found as a result of a defect or incident. A bent connecting rod leads to a lower final compression pressure because the piston can no longer reach TDC of the cylinder. Some causes of a bent connecting rod are:
As one of the most common causes, a liquid in the combustion chamber during the compression stroke leads to a bent connecting rod. In contrast to air, a liquid is not compressible. This is called a “hydrolock”. This can occur in the following situations:
- The head gasket is cracked between a coolant passage and the cylinder chamber. The coolant can leak freely into the combustion chamber. While the engine is running, the chance of hydrolock occurring is small. It mainly occurs during pressure testing (pressurizing the cooling system), when the coolant is forced through the crack. If we suspect that a cracked head gasket is causing coolant leakage, the cylinder can be inspected with an endoscope during the pressure test. In the event of a leak, there may be a puddle of coolant lying on the piston;
- (Rain)water has been drawn in from outside. In heavy rainfall, deep puddles can form on the road. Also think of a high water level in a tunnel. When driving through a deep puddle, a considerable amount of water can enter the engine via the air filter;
- A physical object has entered the cylinder, such as a screw or other material that is drawn in through the intake.
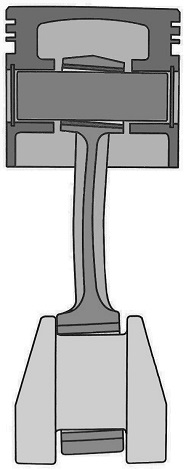
At the moment the damage occurs, there is an enormous pressure above the piston. The connecting rod is pushed onto the crankpin of the crankshaft with an unusually high force. This force can squeeze the lubricating oil film out from between the plain bearings and the bearing journals, both from the connecting rod and from the main bearings of the crankshaft. Once the oil film has been displaced, mechanical friction occurs immediately, causing bearing damage and possibly crankshaft damage as well.
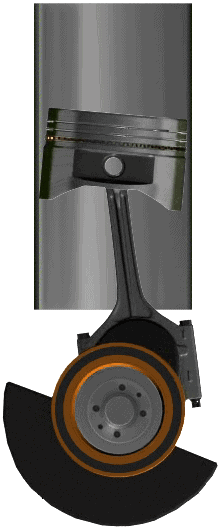
In addition to the friction between the bearings and the bearing journals, with this kind of damage to the connecting rod there is a high chance of immediate damage to the piston pin.
The image above shows the cross-section of the piston, clearly showing the consequences of a bent connecting rod. The piston pin and the connecting-rod big-end journal are no longer loaded centrally but at an angle. The piston pin can break and the bearings will immediately start to wear and “seize”.
Broken piston pin:
A broken piston pin can occur after overloading due to abnormal combustion, for example when detonation takes place, or due to foreign objects or liquid in the combustion chamber during the compression stroke. The overload can also be caused by excessively high combustion pressures as a result of performance enhancement (chiptuning, turbo, etc.).
Careless assembly can also be a cause of a broken piston pin. When impact damage is caused with a hammer during assembly, this can lead to a small crack.
This initial crack can lead to the piston pin breaking, even under normal load.