Introduction:
A tyre has a number of functions that every tyre sold, whatever the price, must meet:
- Rolling
- Carrying the vehicle
- Transmitting drive and braking forces
- Steering
- Damping vibrations
- Long service life.
This page describes all components in a tyre, the names and the different properties.
Different parts of a tyre:
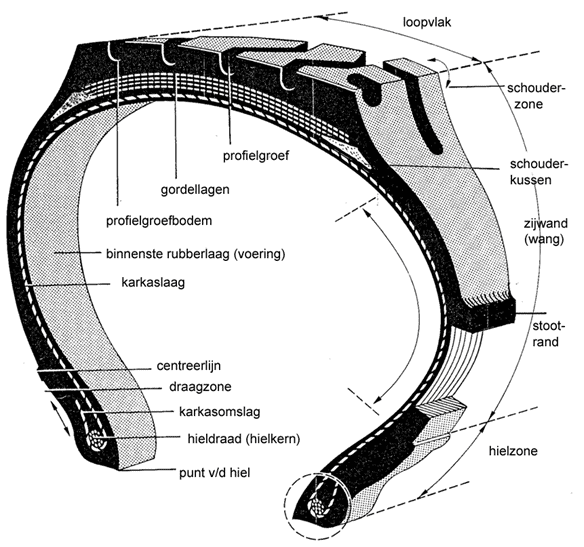
The side of the tyre is called the “sidewall”. The sidewall is designed to be as flexible as possible to contribute positively to comfort. Sportier tyres, on the other hand, have somewhat thicker and stiffer sidewalls to provide a better steering response. The disadvantage of this is that comfort decreases. Bumps in the road surface are then more noticeable, which can be experienced as unpleasant. The construction of the tyre carcass gives the tyre its strength. The tread is intended to provide grip on the road surface and to drain rainwater. The tread contains main grooves and tread blocks between the main grooves. (See the paragraph Tread pattern)
The bead keeps the tyre clamped airtight on the rim. Because of this, unlike classic tyres, no inner tube is needed anymore. The outer tyre alone is sufficient. These are called tubeless tyres.
Data and markings on the tyre:
The sidewall of a car tyre always shows the brand and type of the tyre. There are also a number of numbers and letters on it. From these numbers and letters you can see what the size is (width, height and the diameter of the hole where the rim fits), what maximum speed you are allowed to drive and how much weight the tyre may carry at most. Below is an explanation of what this data means:
In this example we use a tyre with the size 205 / 55 R16 91v
205 = the width of the tread in mm (so 20.5 cm wide).
55 = the height / width ratio of the sidewall in relation to the width of the tread (the height of the sidewall is 55% of the width of the tread). This means that if the tread width is 20.5 cm, the sidewall height is 55% of that, so 11.2 cm high.
R = Radial tyre (there are radial and diagonal tyres). Nowadays, because of the strength of the tyre, only radial tyres are used on passenger cars.
16 = Inch of the rim the tyre is mounted on.
91 = Load index (the maximum weight that may rest on the tyre). The load capacity must always be equal to or higher than the weight of the car when fully loaded. (See the table below)
V = Speed rating (the maximum permissible speed for the tyre). By law you may never fit tyres with a lower speed rating than the car’s top speed, even if the driver always drives calmly and never faster than 120 km/h.
The tables below show the load index and the speed rating. The weights are in kg and the speeds in km/h.
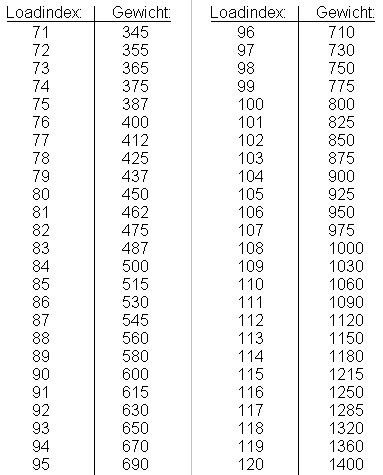
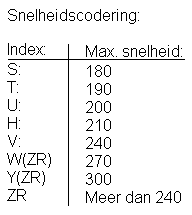
The tyre from the example (205 / 55 R16 91v) may therefore be fitted to a car whose maximum speed according to the manufacturer’s specifications is below 240 km/h and which may technically not be loaded with more than 615 kg on one tyre.
It is not correct to divide the “permissible maximum mass of the vehicle” stated on the registration certificate by 4 to calculate the maximum weight per tyre. To calculate it correctly, the weight of one axle must be divided by 2. For that, the maximum axle loads for both the front and rear must be known. These axle loads can then be divided by 2 to determine the maximum weight per tyre.
Choosing the tyre size:
You should always fit the same tyre size as the one that was originally on the car. The speed rating and load index may differ, provided that the minimum values are not undercut.
If you deliberately choose to fit a different size (for example when choosing larger rims, or a smaller winter wheel set) you must pay close attention that the static rolling circumference remains the same. The static rolling circumference is the distance the wheel covers in one complete rotation. There is already quite a big difference in circumference between 225/40R18 and 225/45R18.
When the circumference of the tyre changes, the car’s speedometer will indicate a higher or lower speed than is actually being driven. Faults can also occur in the ABS system when two different sizes are fitted on one vehicle.
To prevent this, the other tyre size must still have the same static rolling circumference. To check this, you can compare the currently fitted tyre size with the desired tyre size using the handy calculator on the page: tyre height and static rolling circumference calculator. With this calculator you can calculate the tyre circumference very accurately and choose the tyre size that hardly deviates from the factory data.
DOT code:
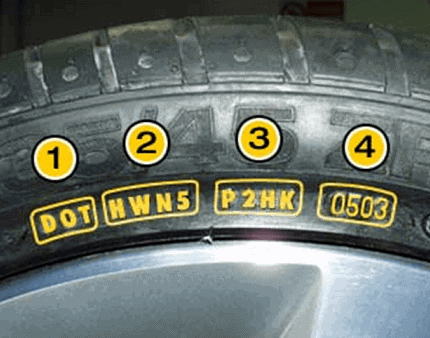
All tyres have a DOT code. This is determined during tyre production and applied to the tyre. From this code you can derive the identification code, manufacturer’s codes and, most importantly, the production date. Below is a list of the different characters in the DOT code. These codes refer to the image below.
- (DOT): The “DOT” designation, which is an abbreviation for: Department Of Transportation. This indicates that the tyre complies with safety standards in the United States.
- (HWN5): Identification code of the factory
- (P2HK): Additional codes of the manufacturer
- (0503): Production date: The first 2 digits indicate the production week (the 5th week), and the last 2 digits indicate the production year (2003).
For tyres produced before the year 2000, this consists of only 3 digits (the last digit then stands for the year).
Examples:
319: Week 31 of the year 1999
2812: Week 28 of the year 2012
A tyre that is 6 years or older has an increased risk of drying out and other defects. It is therefore essential to pay attention to this when buying used tyres. Tyres older than 10 years are at the end of their service life. Even if the tread is still sufficient, it is wise to replace the tyres.
Tread pattern:
The tread of the tyre consists of a number of channels that ensure that rainwater is drained away. When driving at 100 km/h in rainy conditions on a wet road surface, the tyre can roll through as much as 10 litres of water per second. With too little tread depth, the tyre would not be able to drain the water fast enough and may start to float on top of the water. That makes braking and steering impossible. This is called aquaplaning. It is therefore important that the tyre always has sufficient tread. With worn, or unevenly worn tyres, the water-draining properties are therefore also greatly reduced.
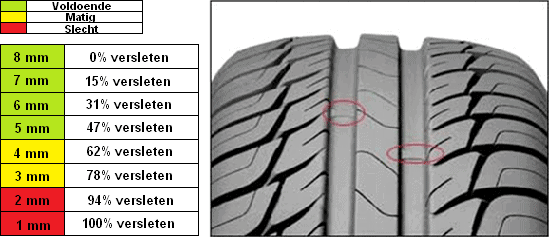
New tyres have a tread depth of 8 mm. Tyres with a tread depth of 2.5 mm or less are recorded as an advisory (A.C.) point for the periodic inspection (APK). If the tread depth is 1.6 mm or less, the tyre is rejected. It is therefore advisable to replace the tyres when they are below 3 mm. Aquaplaning can already occur at 2.5 mm in heavy rain.
The table gives a good indication regarding tread depth. The red markings on the image of the tyre indicate the wear indicators. These have a height of 1.6 mm. As soon as the indicator is flush with the rest of the tread, the tyre has 1.6 mm of tread or less. It is then essential to replace the tyres.
Wear:
Tyres obviously wear as the car is driven more. With a calm driving style, the tyres will last longer than with a sporty driving style with frequent hard acceleration. There are also other causes that will make the tyres wear faster, namely:
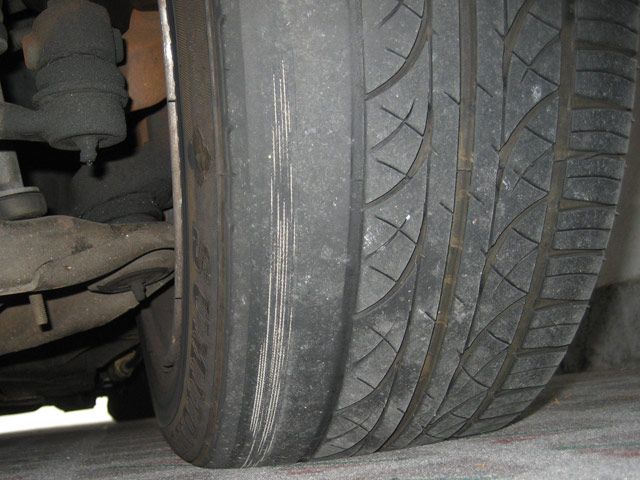
- Incorrect wheel alignment, causing the tyres not to sit square on the road surface while driving. This may be due to incorrect camber or incorrect toe settings. (See the Wheel alignment chapter.) The tyres may then wear unevenly, so that the sides of the tyre are completely worn while there is still 4 mm of tread left in the middle (see the image below).
- Defective and worn (too soft) shock absorbers. The tyres will bounce and hop more because they follow the movement of the spring more. Cupping can then occur. This means that the tyre is no longer perfectly round, but has height differences in several places. While driving, a humming sound can then be heard, which can be very annoying.
- Imbalance in the wheels. Because there is a constant vibration at the same spot, wear will be higher there than at another point.
- Tyre pressure. With (far) too low tyre pressure the tyre can wear up to twice as fast. That is why it is always recommended to check tyre pressure every month or at least every other month. Other important advantages of correct tyre pressure are safety and fuel consumption; with low pressure fuel consumption can increase significantly due to the higher rolling resistance. Too low pressure can also affect safety. The tyre may have too little grip on the road. The car may start to slide earlier. The correct tyre pressure is shown on most cars on a sticker in the fuel filler flap or in a door opening. Never let the tyre pressure drop below 2 bar.
- Driving style. With a brisk driving style, with hard acceleration and fast cornering, wear also increases significantly.
There are wear indicators in the tread pattern. These wear indicators are 1.6 mm high. When the tread is so worn that the depth of the main groove is level with the wear indicators, the tyre must be replaced. From this wear limit it is dangerous to continue driving in rainy weather.
The image shows the tyre of a car with too much positive camber. The carcass is visible, while the tread appears fine from the outside.
Flat tyre & repair:
Any tyre can go flat. This usually happens because a sharp object, such as a nail, is stuck in the tread. On modern cars, the driver is warned by the TPMS tyre pressure monitoring warning light. If you do not continue driving on a flat tyre, but fit a spare wheel in time, the tyre can still be repaired in most cases. If you continue driving with a flat tyre and a lot of air has escaped, the sidewall may become damaged. If this is the case, the tyre must always be replaced.
If the tyre is punctured in the sidewall because a nail pierces through the very edge of the tread, or when the side of the tyre (the sidewall) has been punctured with a screwdriver, the tyre may not be repaired. The sidewall of the tyre is very vulnerable because it moves a lot. The tyre flexes here, and when cornering the sidewall also allows the lateral movement of the tread (which is called the slip angle).
A tyre must also never be repaired when the hole is larger than 7 mm, or when the leak is outside the tread area, e.g. in the sidewall of the tyre or just next to the tread. Multiple repairs on the same tyre (due to several leaks) are also not recommended. A repair does weaken the tyre. Manufacturers can no longer guarantee safety if more than 2 or 3 repairs are carried out on one tyre.
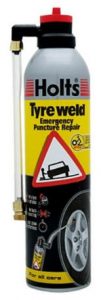
Nowadays a tyre repair kit is often supplied instead of a spare wheel. This fluid is intended to temporarily seal the leak. If there is a nail in the tyre, the fluid will form a solid seal around the nail. No more air can then escape. However, this is only a temporary repair. You must then go to a garage to have a permanent repair carried out. The disadvantage of the fluid is that it does not seal for the long term (the tyre can start leaking again). It also causes a lot of imbalance in the wheels due to the weight of the fluid, which is constantly shifting as the wheel rotates, but that is not a big problem for a short drive to the garage. It is also difficult to remove once the tyre has been taken off the rim.
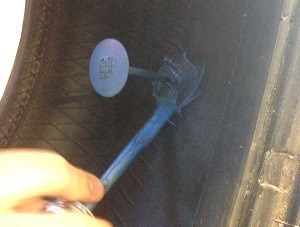
Repair from the outside:
At the garage the tyre can be repaired from both the inside and the outside. From the outside, the tyre does not need to be removed from the rim and a plug is inserted to seal the hole. This method should be regarded more as an emergency repair rather than a permanent repair. The plug can, among other things, come out of the tyre at high vehicle speeds. Furthermore, when carrying out this emergency repair, the inside of the tyre is not inspected; if you have driven too long with a tyre with low pressure, damage to the inside of the sidewalls may be visible. Over time this can lead to a blowout.
Most roadside services or garages that repair the tyre in this way advise the customer to have the tyre repaired from the inside within a short time. Because the tyre is then removed from the rim, the inside can be checked for damage and a permanent repair is carried out with a so‑called “mushroom plug”.
Repair from the inside:
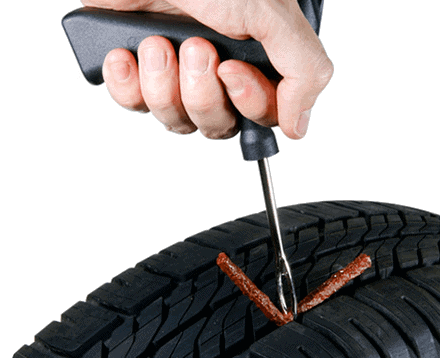
From the inside, the tyre must be removed from the rim and a plug in the shape of a mushroom is pulled from the inside out. This fills the hole. On the inside there is a flat section that ensures that the plug cannot come out and seals the hole even better. This repair from the inside is always recommended, because it is the safest. However, it takes more time, which is why in some cases people consciously opt for an external repair. The disadvantages and risks are described above.
Because there is often confusion about the correct repair sequence, the 11 steps below describe how the repair should be carried out:
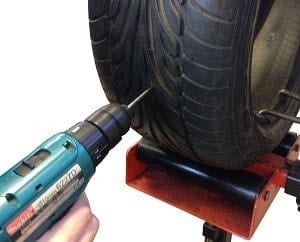
Step 1:
Remove the tyre from the rim.

Step 2:
Remove the object from the tyre.
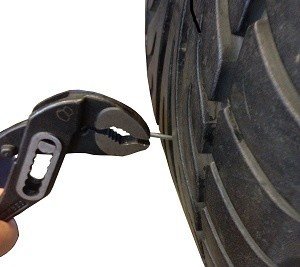
Step 3:
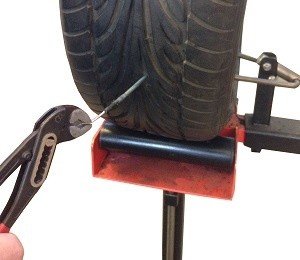
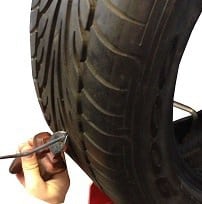
Enlarge the hole slightly with a drill so that it is big enough to move the plug through.
Step 4:
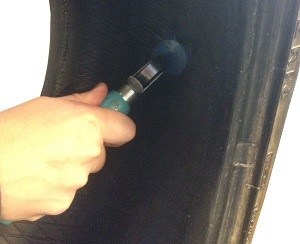
Lightly roughen the area around the hole and degrease it thoroughly. Do not sand too hard; if bits of rubber come loose, the repair becomes much more difficult. The sanding is only intended to roughen the surface so that the adhesive can bond well.
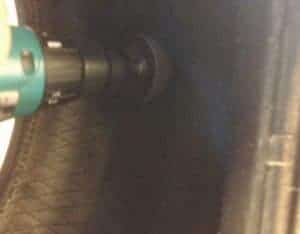
Step 5:
Insert the plug through the hole, but do not fully pull it tight yet. Make sure that the flat part of the plug does not touch the inside of the tyre.
Step 6:
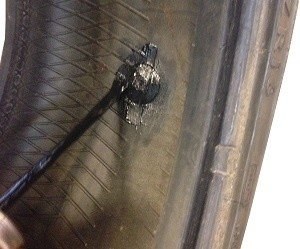
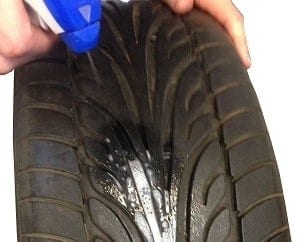
Apply the special blue glue to the surface of the tyre and to the underside of the plug. Make sure there is a thin layer of glue, but do not apply too much! Thick blobs or drops will not dry.
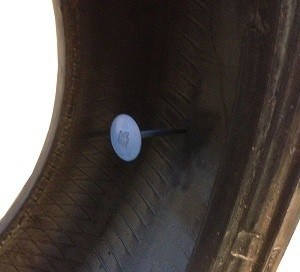
Step 7:
Wait 10 to 15 minutes until the glue has dried and pull the plug completely through the tyre. If the glue has not fully dried yet, the plug will not stay in place. So wait long enough.
Step 8:
Use the designated roller to roll over the plug to press it down firmly. If you do not have this roller, use the back of a screwdriver to roll over the plug. If the edges around the plug slowly start to lift again and therefore do not remain stuck, the glue has not dried long enough. In that case, remove the plug again. If the flat part of the plug around the hole does stick neatly, continue to step 9.
Step 9:
Apply vulcanising glue over the entire repaired section so that a protective layer forms over the edges of the plug.
Step 10:
Cut off the end of the plug that sticks out on the outside of the tyre as close to the tyre as possible. Pull on the plug while cutting so that no part of the plug protrudes after cutting.
Step 11:
Use soapy water or a leak detection fluid to check whether the tyre no longer leaks at this point. If air bubbles appear, the tyre must be removed again and the procedure started again from step 1.
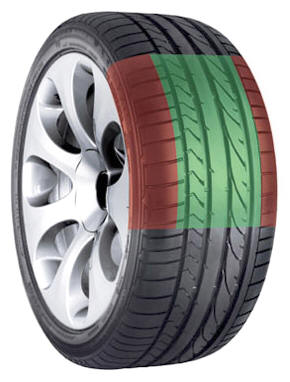
The repair may only be carried out in the tread area. In the image below, this is indicated in green. When the object is too far to the side (in the red area) of the tyre, the tyre may no longer be repaired for safety reasons. This is too close to the sidewall of the tyre, which is the area that flexes in and out the most. As a rule of thumb, three-quarters of the surface can be repaired. Three-quarters corresponds to the green marking in the image.
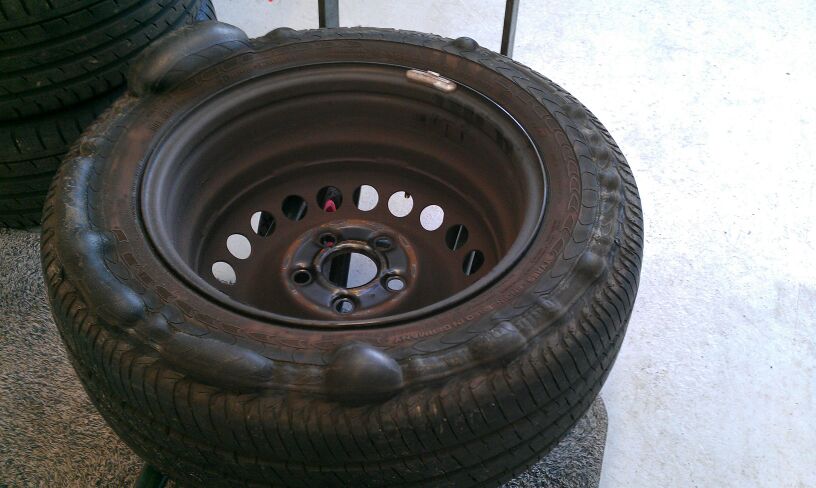
If you drive too long on a flat tyre, damage can occur to the carcass. The tyre in the image on the right is from a VW Caddy. It is a miracle that this tyre did not burst while driving. The tyre is of course beyond repair and must be replaced. If there is a small bulge on it, as can be seen on the right-hand side (at 3 o’clock), this will already cause an MOT failure because it is not safe.
Make sure the spare wheel always has sufficient pressure. Check this every year. A full-size spare wheel must be inflated to approx. 3 bar and a space-saver (emergency wheel) to approx. 4.2 bar.
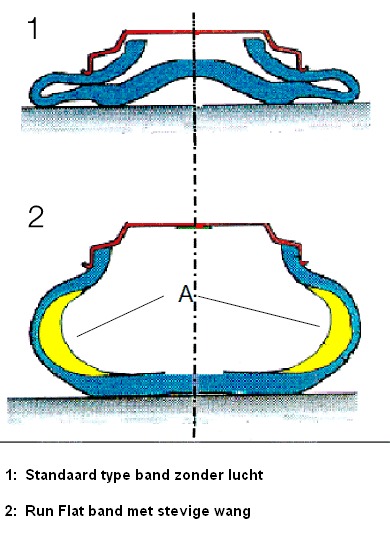
Run-Flat tyres:
Run-Flat tyres have the advantage that you can continue driving with a flat tyre. This is because the stiffness of the sidewall is high. If the tyre loses air, this stiffness ensures that the rim does not come into contact with the ground. It is then actually not visible that the tyre is flat. The sidewall remains upright, even though there is too little air in the tyre. A warning on the onboard computer must therefore indicate that a tyre is flat; otherwise it cannot be seen. This is done via the TPMS (Tyre Pressure Monitoring System).
Of course, it may be noticed while driving because the car handles differently in corners. However, many people think that when a Run-Flat tyre is flat, they can always keep driving until it is repaired. This is not true. A Run-Flat tyre that is flat must always be kept at a pressure above 1 bar. If you continue driving at a pressure below 1 bar, the sidewall will be damaged and the tyre must also be replaced. If the tyre is kept above 1 bar by using a compressor from the boot, it can usually still be repaired afterwards. Disadvantages of Run-Flat tyres are primarily the price (often much higher than a tyre of the normal type) and the comfort. Due to the stiffness of the sidewall, the tyre will also be much harder and therefore less comfortable. Run-Flat tyres cannot simply be fitted on standard rims; the shape of the rim is unsuitable for that. The reverse is possible: standard tyres can be fitted on Run-Flat suitable rims, but the risk is that in that case the car will often not be equipped with a tyre pressure monitoring system and a flat tyre will therefore not be detected quickly enough.
Price / Quality ratio:
There are very many types and brands of tyres. For a certain size there is often a choice of different prices. In most cases, the price also says a lot about the quality of the tyre. For a certain tyre size you can often find prices between 60 and 200 euros. The cheapest tyres are often of lower quality. This can be noticed in the driving characteristics (for example more body roll in corners, earlier sliding on a wet road surface). A cheap tyre will often wear harder and sometimes unevenly due to the quality of the rubber, and will often make more noise. Fuel consumption may also increase due to the possibly higher rolling resistance. Choosing an A-brand is therefore often the best option.
Rims; terms and designations (including bolt pattern and offset (ET value)):
The image shows a drawing of a rim. After mounting, the bead of the tyre is clamped between the rim flange and the humps on both bead seats of the rim. Because of the hump, the tyre cannot slip off its position on the rim. If that were to happen, the air would escape suddenly and the rim would end up on the road. This could also happen in the event of a blowout or if you continue driving with a flat tyre.
There are various designations on a rim. These are usually applied to the inside of a spoke or on the hub. An example of this is: 7.5J x 16 LK 112ET 35.
The data 7.5J (width) and 16 (diameter) can be seen in the image above. We now continue with the rest of the data, such as the bolt pattern (112) and the offset, the ET value (35);
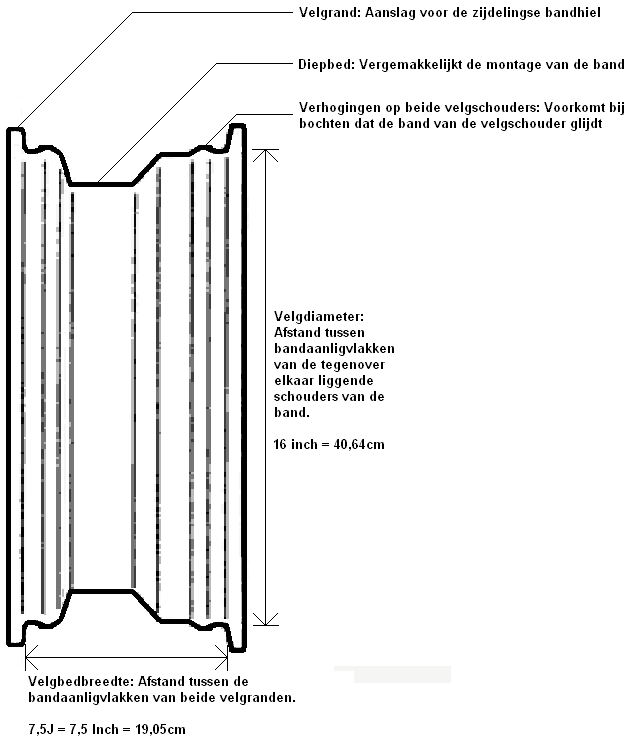
Bolt pattern:
The number 112 is the diameter in millimetres in which the wheel bolt holes are located. This is also called the bolt pattern (PCD). Every car has a certain bolt pattern, which is recorded in the factory specifications or stamped on the rims mounted on the car. With a 5 x 112.5 bolt pattern, an imaginary circle must be drawn through the centre of the wheel bolt holes. An example of this can be seen in the two images below. The diameter of the circle is the bolt pattern. With a 4 x 100 bolt pattern, you can measure from centre-to-centre of two opposite bolt holes.

Multi-fit:
There are also rims with multiple wheel bolt holes (in the image as many as 10). These rims can be mounted on several types of cars with different bolt patterns.
ET value (offset):
ET 35 stands for the ET value. The ET value (from the German “Einpress Tiefe”) represents the distance between the hub mounting surface and the centre line of the rim. In Dutch it is also called the “wielbolling” or “offset”. The greater the distance between the hub mounting surface and the centre line of the rim, the higher the ET value. Below is an image with an explanation:
Most rims have a positive ET value. The hub mounting surface of the rim is then further to the outside than the exact centre line of the rim. With a rim with ET value 35, the hub is 35 mm (i.e. 3.5 cm) from the centre line of the rim (the red dotted line). The distance between the hub mounting surface and the centre line of the rim is marked in yellow in the images. If one decides to fit other rims on the car, the ET value must be taken into account. It may be that the rims on the car have the designation 7.5J ET 35, and that rims with 7.5J ET 50 do not fit.
With ET 50, the yellow marking in the top right image will become larger.
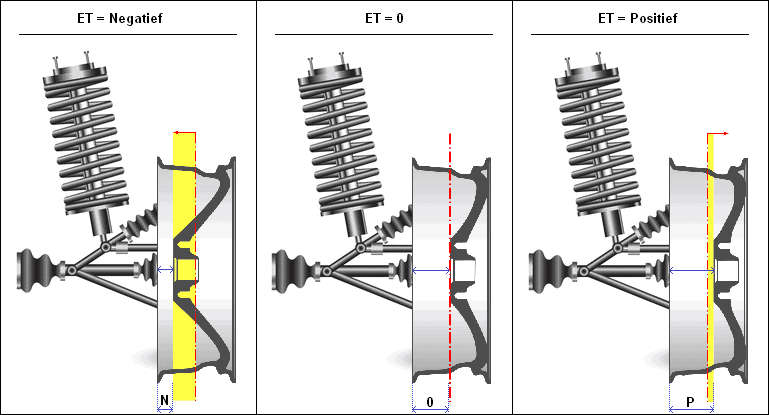
That means that the rim is moved further inwards. As a result, the rim could touch the shock absorber. Not only will the chance of rubbing increase, but the driving characteristics will also deteriorate. This problem can be solved with wheel spacers. These are metal discs mounted on the wheel hub – between the brake disc and the rim. In this case, the difference between ET 30 and ET 50 is 20 mm (2 cm). By mounting 2 cm wheel spacers, the problem is solved. One remark about wheel spacers: in the last example mentioned, the lack of clearance is compensated for by the wheel spacers. However, it is not advisable to fit these when the ET value is already correct. The wheels will indeed sit a little further outwards, but the scrub radius (and therefore the driving characteristics) will then move outside the factory tolerances. Even though this often looks visually nice and sporty, it definitely has disadvantages.
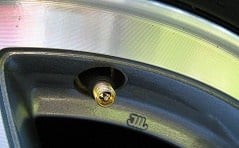
Valve and air pressure:
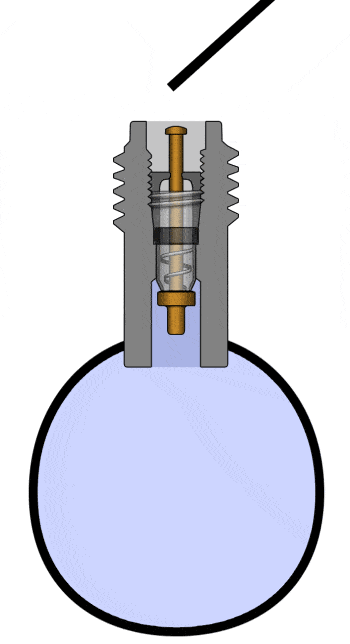
The valve is mounted in the rim of a car so that the air remains in the tyre. The air in the tyre is pumped in through the valve. It is recommended to replace the valve when replacing the car tyres, because over the years it dries out. This can cause leakage, which will make the tyre deflate more quickly.
The valve is made of rubber and is sealed by means of a valve cap. The purpose of this cap is not to keep the tyre at pressure, but to prevent dust and other dirt from entering the inside of the valve. Inside the valve there is a metal core with a spring screwed into the valve body (see the image below). When air is pumped into the tyre, the pressure from outside is greater than that inside the tyre. When the air pressure in the tyre inflator (outside) is 8 bar and in the tyre is 2 bar, the air is forced past the core into the tyre.
In the situation shown in the image, air is escaping because the core is being pressed in by an object against the spring force of the valve. The air inside the tyre (e.g. 2 bar) is higher than the outside air pressure (1 bar), so the air pressure in the tyre can escape to the outside. When the air pressure in the tyre is higher than the outside air pressure, the air pushes against the bottom of the core so that it seals. The air cannot escape due to its own pressure.
Wheel bolts:
Wheel bolts, apart from diameter and length, come in two types: conical and spherical-seated (ball-seat). When fitting different wheels, you must pay close attention to the fact that there can be a difference in the shape of the head that clamps in the rim. The image shows the difference in the wheel bolts; conical on the left and spherical-seated on the right. If the bolts are accidentally swapped, there is a high risk that the bolts will come loose while driving.
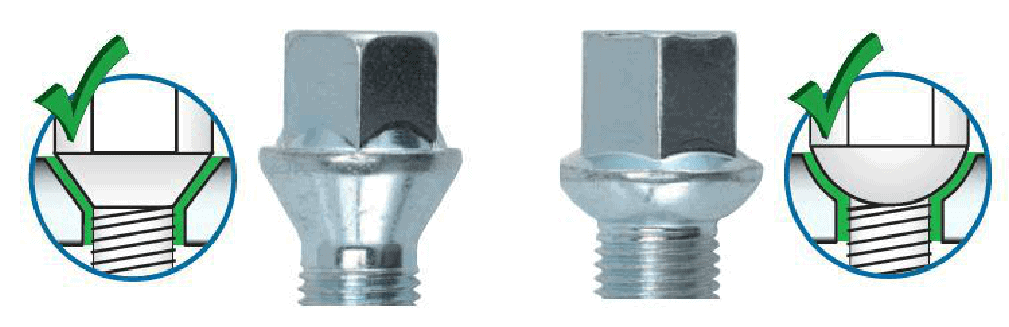
Make sure that the correct wheel bolts are also used for the spare wheel. If other wheels with conical wheel bolts are fitted and the vehicle is originally equipped with rims that use spherical-seated bolts, the spare wheel cannot be fitted with the bolts from the wheels on the vehicle in the event of a flat tyre. In this case, always place a set of correct bolts in a compartment near the spare wheel and inform a customer about this (if applicable).