Introduction:
The timing drive is mainly responsible for driving the camshaft, and possibly the water pump and/or fuel pump in a diesel engine. The water pump can be driven by the timing belt, but also by the serpentine belt. Nowadays many manufacturers even use electrically driven water pumps. The timing drive can be driven in different ways. These are described further down the page.
Timing:
It is important that the timing is set correctly. When disassembling/assembling the belt or chain, it is necessary to set the timing marks on the crankshaft, camshaft and in some cases the fuel pump of diesel engines to the zero point (timing it). This is indicated by marks on both the engine block and the gears or pulleys, or the only way to set the timing correctly is by installing locking tools. By locking the gears with special locking pins it can be prevented that they unintentionally rotate while replacing the timing belt or chain.
After installing the belt, the tension also has to be checked and adjusted. This can be done by means of a tensioner pulley with a hydraulic tensioner element or with a manual adjustment option. With a timing chain, the tension is automatically controlled by a hydraulic chain tensioner, which tensions more or less depending on the oil pressure.
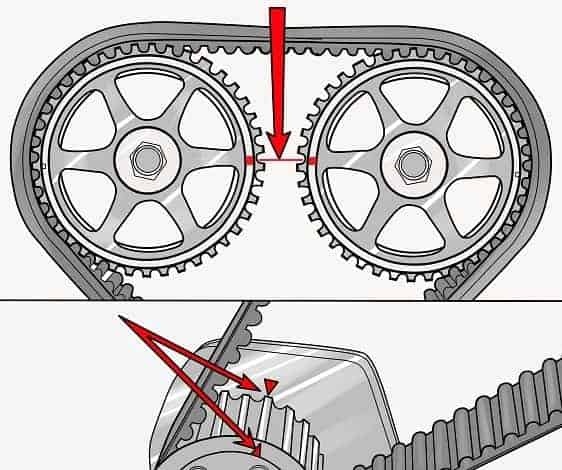
The illustration makes clear what is meant by timing. At the top are the two camshaft gears. There are (red) markings on these two gears. In reality these are often two notches that have been ground into the gear. According to the instructions, these must face each other (the left gear at 3 o’clock and the right gear at 9 o’clock).
The crankshaft gear also has a marking. Here too there is often a notch ground into it. The marking point must correspond with the marking point on the engine block. When the marking points on the crankshaft and engine block line up, but the points on the camshafts are rotated 180° (half a turn), the crankshaft must be turned one more revolution. Each camshaft gear has twice as many teeth, so when the crankshaft makes 2 rotations, the camshafts have rotated 1 revolution.
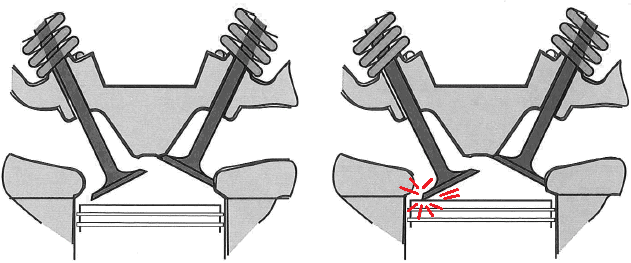
If the timing is not set correctly, the valves will open too early and also close too early (or open too late and therefore close late). This can lead to poor starting, rough running of the engine and loss of power. In the worst case, where the timing belt is off by one or more teeth relative to the zero point, the pistons can hit the valves. In most cases this leads to severe engine damage. On some engines, engine damage can already occur when the timing is off by just one tooth. So pay close attention during assembly.
Timing belt:
A timing belt lasts (depending on the engine type) about 60,000, 90,000, 120,000, 180,000 or sometimes even 250,000 km. Besides the mileage there is also a certain time limit, e.g. a maximum of 4 years. As the belt ages, it can dry out or in the worst case crack, causing the belt to eventually break. The advantages why a manufacturer chooses a timing belt are:
- Inexpensive
- Does not need to be lubricated, in contrast to a chain and gears (nowadays there are timing belts used in combination with engine oil, e.g. by Ford).
- Low weight
The disadvantages of a belt are that it has to be replaced periodically and that it is sensitive to oil or coolant that can escape from the crankshaft and camshaft seals or the water pump, if the latter is mounted in the timing section.
Timing belt with separate camshaft belt:
The image below shows an engine with a double overhead camshaft, which is driven by two timing belts. The camshaft gear (1) is driven directly by the crankshaft via the large belt. On the back of the pulley of gear 1 there is a small gear, over which the rear belt runs. This rear (small) belt drives camshaft gear (2). The small belt requires a separate tensioner pulley. This is usually used on four-cylinder engines with 16 or more valves (so 4 or more valves per cylinder).
Timing chain:
In contrast to a timing belt, which has a replacement interval, a timing chain is virtually maintenance-free. After improvements in terms of noise and friction, a number of manufacturers have switched back to chains. A timing chain can last the lifetime of an engine. The tensioners used here often operate on hydraulic pressure and spring force, so the chain tension does not need to be checked regularly.
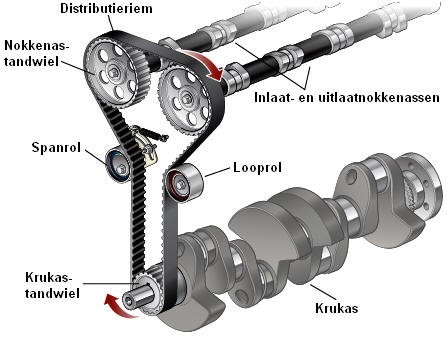
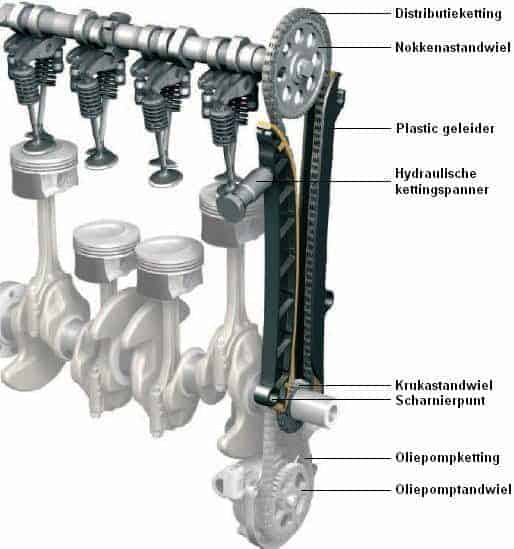
The image below shows an engine with a single camshaft fitted with a timing chain. The crankshaft gear drives the camshaft gear via the timing chain. The chain slides along the plastic chain guide. This is of course lubricated by engine oil. The hydraulic chain tensioner presses the plastic chain guide against the timing chain. The guide pivots around the pivot point at the bottom. This forces the chain tight. There must be no play in the chain, otherwise it can start to rattle. Inside the hydraulic chain tensioner is a strong spring that ensures that the chain also remains tensioned when the engine is switched off. When the engine is running, the oil pressure in the chain tensioner will help to press the tensioner with more force against the guide.
The oil pump gear is driven by a separate oil pump chain. The operation of the oil pump with separate chain is described on the lubrication system page.
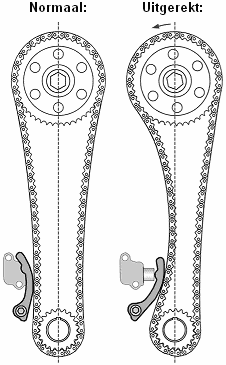
It can happen that a timing chain becomes longer. We then speak of a stretched chain. Every chain gets a bit longer as it gets older, but that often falls within tolerances. However, it can occur that a chain stretches so far that malfunctions can arise. Possible causes of a stretched chain are:
- The type of material the chain is made from affects its service life.
- Driving at too low engine speeds, causing additional engine vibrations.
- Very sporty driving style with frequent acceleration.
- Aged engine oil due to infrequent oil changes.
The following symptoms indicate a stretched timing chain:
- Rough or uneven running of the engine due to incorrect valve timing (the valves no longer open and close at the correct moment)
- The engine warning light (MIL) can come on. A fault code may then be present relating to incorrect timing between crankshaft and camshaft.
- Rattling noises after starting and when the engine fires up. This may be caused by play between the chain and guide and the chain tensioner still needing to fill with oil before it can take up the slack. After the chain tensioner has pressed the chain further, the rattling noise may disappear, but over time it can get worse because the tensioner has to move further and further outward.
- Rattling noises while the engine is running. When a constant rattling noise from the timing chain is audible, the tensioner may have moved to its maximum outward position and there is still play between the chain and the guide. That is a sign that you definitely must not continue driving, because the chance is high that the chain can jump over the gears. The result is that the pistons can hit the valves and thus severe engine damage occurs.
While the chain is rattling it strikes against the plastic guides. Especially with older guides, where the plastic has hardened, the chance is high that pieces of plastic break off. Besides the fact that the chain now has even more room on the guide, the broken piece of plastic can end up in the oil pan. The result is that the piece of plastic ends up against the pickup screen and blocks the oil flow to the oil pump. This results in too low oil pressure and therefore lubrication problems for the engine components. Ultimately this can cause catastrophic engine damage.
Multiple timing chains:
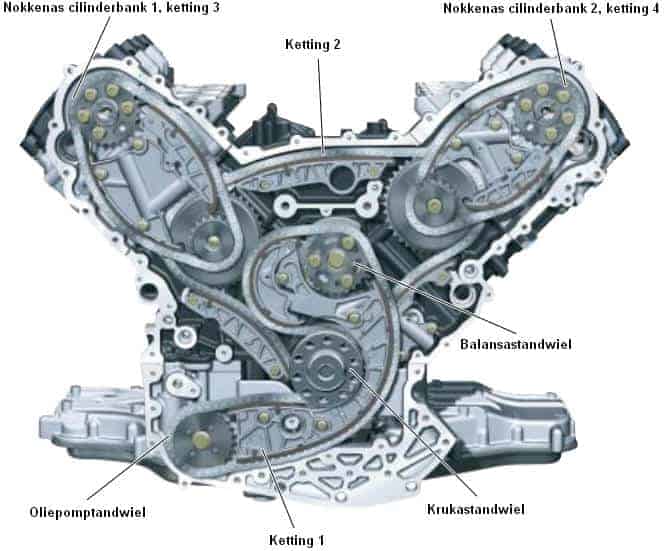
An engine can also be fitted with multiple timing chains. In the V-engine in the picture there are as many as four separate chains. Chain 1 drives the oil pump and balance shafts. Chain 2 is connected to the crankshaft and the drive gears of the camshafts. Via chain 2, chains 3 and 4 are driven, which in turn drive the camshaft gears. Each chain is tensioned by its own chain tensioner.
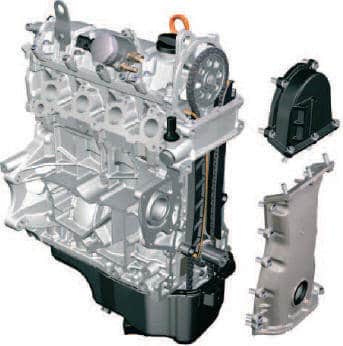
Assembly overview of a timing chain of a Volkswagen engine:
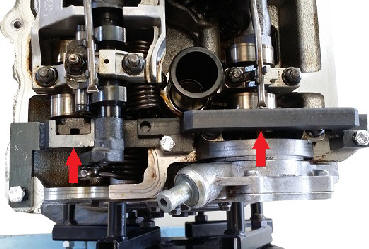
The picture below shows a Volkswagen engine with a cutaway timing housing. The upper and lower timing covers have been removed. These are mounted with sealant and about 25 bolts. The crankshaft seal can also be seen in the lower timing cover. The lower timing cover is also mounted to the oil pan at the bottom.
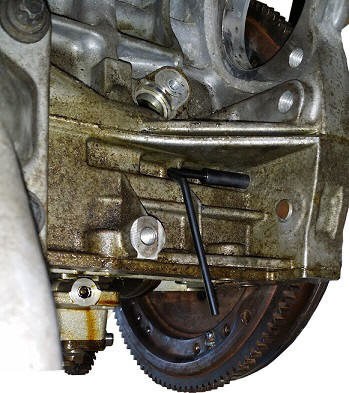
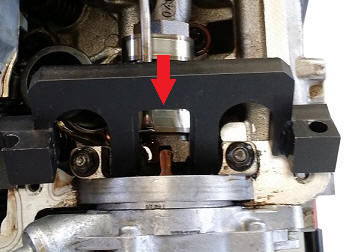
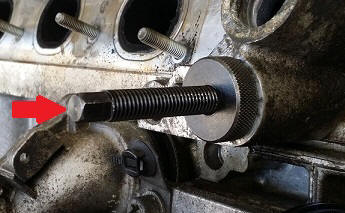
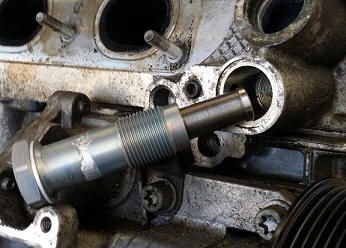
When the timing chain needs to be replaced, the crankshaft must be locked by screwing a special bolt into the engine block. The crankshaft must be rotated until the crank pin touches the bolt. The crankshaft is then in the correct position.
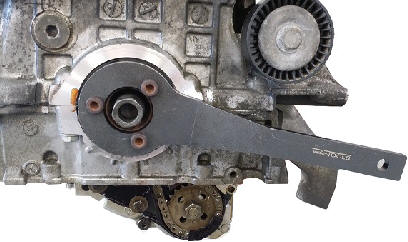
The camshaft must be locked by sliding a special tool with a protruding part into a slot at the rear.
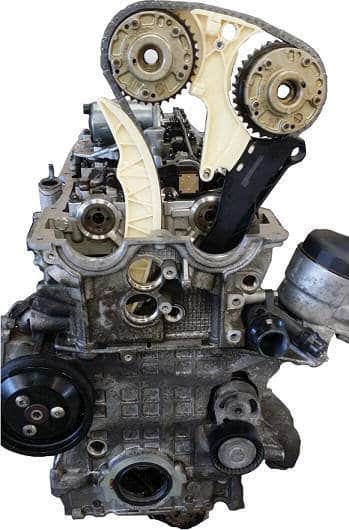
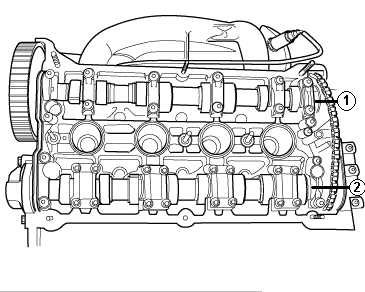
Assembly overview of a timing chain of a BMW engine:
The picture shows a timing cassette of a BMW engine. This BMW engine does not have covers that must be removed to replace the chain. The timing cassette has to be lifted out of the engine as a complete unit. How this works is briefly described below. Some disassembly and assembly steps are not shown because this is not a repair manual, but is only intended to give an impression of the operation and assembly. Always consult the repair manual in which the tightening torques are also specified!
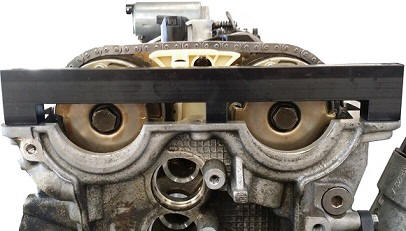
The timing cassette shown consists of the timing chain, a plastic timing guide, a crankshaft gear and two (adjustable) camshaft gears. During assembly, the guide must first be assembled as shown below.
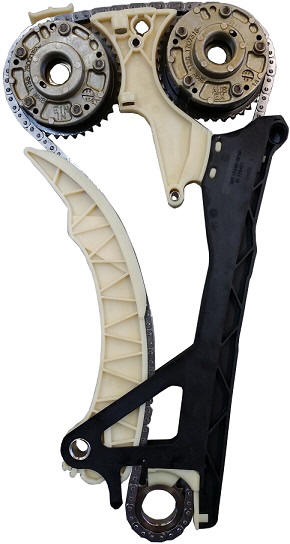
When, with the chain tensioner and valve cover removed, the bolts of the guides, the crankshaft gear and the camshaft gears have been undone, the complete cassette can be lifted out as one piece.
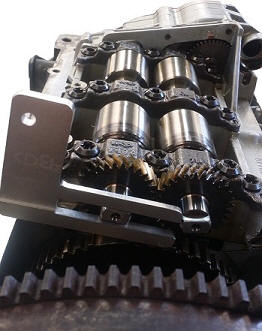
Before the camshaft gears are tightened, the trigger wheels must be set in the correct position by installing a special tool. The protruding pins in the tool are slid into the holes in the trigger wheels so that they are in the correct position.
Because the crankshaft gear and the gear for the balance shafts are positioned one behind the other, the balance shafts must first be locked before the crankshaft bolt is tightened. If this is not done and the balance shafts are therefore not correctly timed, it will actually increase engine vibrations instead of damping them.
After removing the crankshaft bolt, the balance shafts will drop to their lowest point. The chance that the balance shafts rotate out of position is greater than that they remain perfectly aligned.
When the crankshaft, camshaft and balance shafts are locked, the crankshaft flange can be slid into place. The crankshaft bolt can be screwed in a few turns, but it must not yet be tightened.
Before the crankshaft bolt is tightened with the correct torque, the chain guide must first be pressed against the timing chain with a specified force to achieve a certain pre-tension. This can be done with the special tool that must be mounted in the opening of the chain tensioner. By tightening it with a prescribed torque, the timing chain is tensioned sufficiently. The crankshaft bolt can now be tightened.
Always use a special tool to tighten the crankshaft bolt.
When the bolts of the camshafts, guides and crankshaft are tightened, the hydraulic chain tensioner can be installed.
After tightening and removing the special tools, the crankshaft must be rotated two turns clockwise. The timing must be checked again. If it is not correct, the adjustment procedure must be repeated.
Combination of belt and chain:
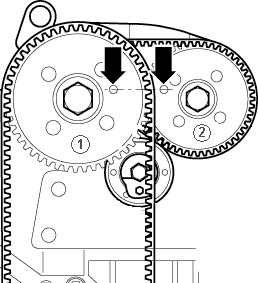
The image shows an engine with double overhead camshafts, which are driven by both a belt and a chain. Camshaft 1 is driven by the timing belt (left). The crankshaft drives this belt. Via the timing chain, the drive for camshaft 2 is provided.
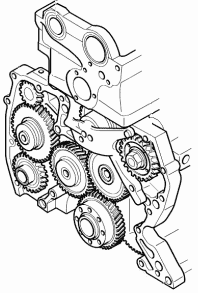
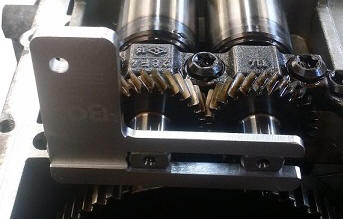
Gears:
Some engines use only gears in the timing drive. The big advantage is that it is completely maintenance-free and there is no risk of the belt ageing, the belt or chain being incorrectly tensioned, etc. The major disadvantage is that it produces a lot of noise. The helical teeth on the gears already dampen much of the noise, but it still makes much more noise than a belt or chain. That is also a major reason why this type of timing drive is not used very often.